What to do when you get your new Vacuum Chamber Machine!
1. Remove all the items from the vacuum chamber. Some of the things that you may have:- A box of characters for your heat sealing bar for coding your bags.
- An extra gasket for your lid.
- An extra heating element
- A part bottle of Vacuum Sealer Oil
3. We now sell both 220 and 110 V.A.C. vacuum sealers. Make sure you know which you have.
The way to be sure is to look on the plate on the machine. To really be sure, check the plate on the pump motor!
110 V.A.C. units should be ready to go as is. You may or may not have a plug installed on your cord. Trust no one - make sure you know the ground is the ground. Plug the power cord into the back of the machine. Find the end of your cord and determine which is the ground lead. Do this with an ohmmeter. (Available almost anywhere for about $10). Put one lead on the housing of the machine and touch each lead on the power cord. When you get a reading of "0", that's the ground. That one attaches to the ground prong on your plug. Go to Step 4.
To set up your 220 v.a.c. circuit
- You may or may not have a plug installed on your cord. Trust no one - make sure you know the ground is the ground. Plug the power cord into the back of the machine. Find the end of your cord and determine which is the ground lead. Do this with an ohmmeter. (Available almost anywhere for about $10). Put one lead on the housing of the machine and touch each lead on the power cord. When you get a reading of "0", that's the ground. The other two are your hot leads. Make sure they are connected to each leg of your power center. It is possible to get 110 on two leads and not have 220 at the outlet. The leads must be connected to two different legs in your breaker box. A 30 amp breaker is most popular for outlets but you can try a 20 amp breaker if you are only going to run this machine on the circuit. When you have the outlet ready, set the voltmeter on A.C. voltage and MAKE SURE it reads 220 or more. If NOT, don't try it. (This is very important! The unit is 220 v.a.c. and you will destroy the pump motor if it runs on 110 v.a.c. and will void your warranty)
4. Start Vacuum packing

- Plug in the cord
- Lift the lid - the spring load will catch and hold up the lid.
- First, let's set the vacuum time. Push the first green button on the left and the vacuum time will show in the led window. Use the increase/decrease buttons to set it at 28 seconds. You can fine tune it later.
- Set the heat on the sealer bar by pushing the button on the far right until the low indicator is lit. Now push the sealer button (the second button from the left) and set the sealer time(not the flashing time) to 2.7 seconds or so with the increase/decrease buttons. (Too long will burn out the heat strip and it will have to be replaced.) You want the bag to seal securely and no more. Newer machines will seal fine at 2.2 seconds. Quick, repetitious sealing of bags will require you to set the time back even more because the sealing strip will not have time to cool down between sealings.
- Put something in a bag and place it inside the chamber with the open end on the sealer bar and under the holder wire.
- Push down the lid to start the vacuum and hold it until the vacuum holds the lid down.
- Watch the vacuum gauge and note the time that the gauge no longer moves lower. Add 2 seconds and set your vacuum time to that time the next cycle.
- Examine the seal on the bag and see if the sealing time needs adjustment (This is one time that "a little bit more" is NOT good!)
Get ready to save Money and Increase Sales!
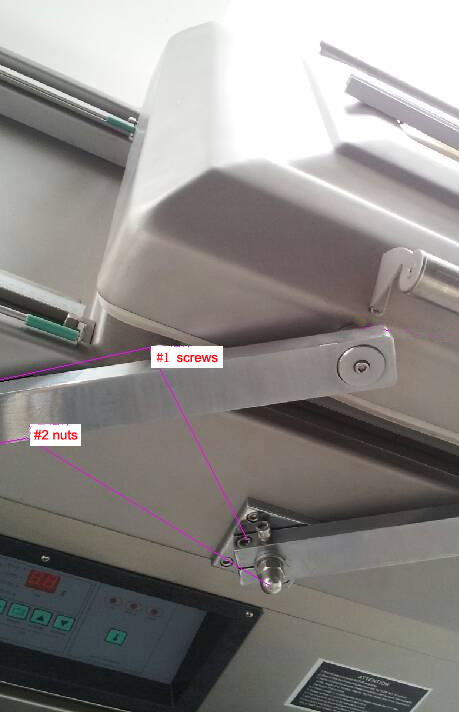
Adjusting the lid on a dual chamber vacuum sealer

After years of hard use, your dual chamber vacuum sealer's lid may need adjustment. It's Easy! Do this!
1, Loose the screws #1 and the set screws beside it and nuts #2 on all four arms.2, Push down the lid, when the vacuum gauge points to yellow or green range, cut off the power and keep the lid sealed on the chamber, then tighten the #1 screws and set screws and #2 nuts. Then turn on the power, push the stop button to release the air.
Repairing the heat strip on your vacuum sealer
There are split bolts on each end of the sealer assembly. Those are the same bolts that the wires connect to. You put the heat strip into the split so that you can wind up and tighten the heat strip after you have replaced the insulating fabric.Oh, yes, replacing the heat strip on the dual chamber machine looks very difficult but it is not. There is one bolt that holds the heat assembly up under the lid. Remove that bolt and it comes down so that you can simply detach the wires on each end and repair the heat strip.


